City Digital Twin AR Zoom Lens - Software Architecture Documentation
Fontys Lectorate High Tech Embedded Systems Eindhoven
Eindhoven
| Date | 26-05-2023 |
|---|---|
| Version | 1.2.0 |
| Status | Finished Draft |
| Author | Skyler Vermeer |
Document History
Version
| Version | Date | Author | Amendments | Status |
|---|---|---|---|---|
| 0.1.0 | 27-02-2023 | Skyler Vermeer | Layout | Layout |
| 1.0.0 | 19-04-2023 | Skyler Vermeer | Update Contexts | Draft |
| 1.1.0 | 16-05-2023 | Skyler Vermeer | Update Data Collection, Storage, Repositories and CI/CD | Draft |
| 1.2.0 | 26-05-2023 | Skyler Vermeer | Spell Check, Conclusion, finishing touches, reformatting | Finished draft |
Communication
| Version | Date | To |
|---|---|---|
| XXX | xxxx | xxxx |
| XXX | xxxx | xxxx |
Introduction
The goal of this document is to depict the architecture of the application in detail, document decisions and detail the steps for further maintenance.
The application that is described in this document is an application where you can use augmented reality to zoom in on fine dust particles and see their impact in the future if trends continue.
Table of Contents
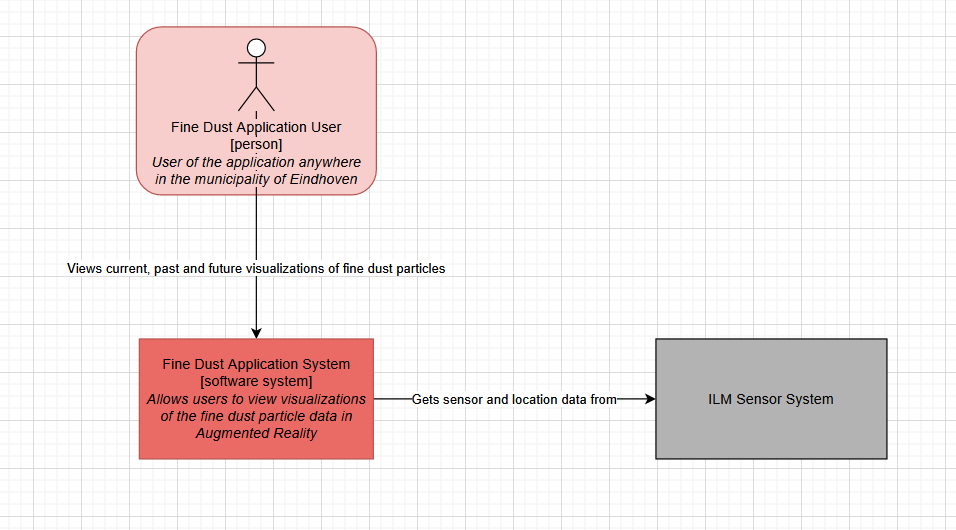
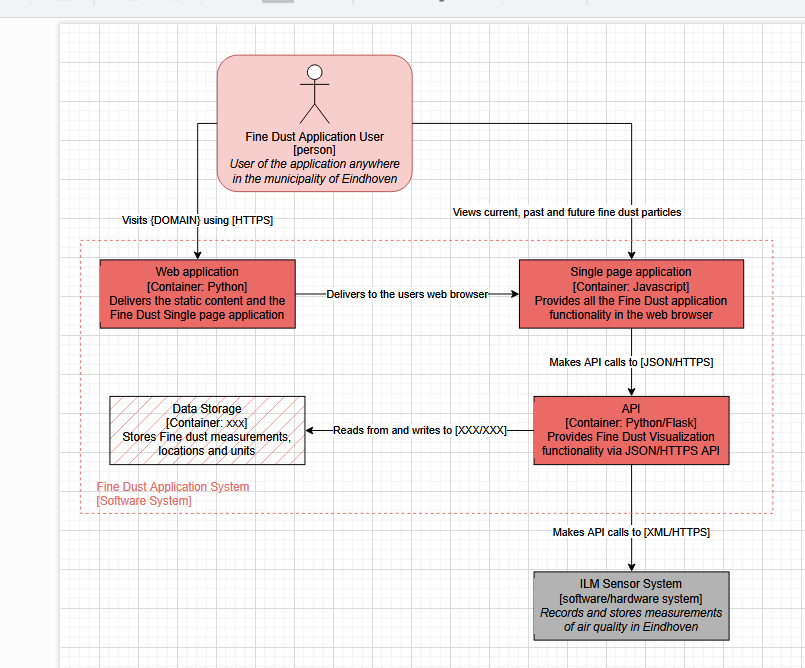
1. Contexts
1.1 C1
1.2 C2
2. Data Storage
2.1 Data Collection & Storage
In my EDA I have extensively described the data sourcing, so I am going to be focusing here on the relevant data and how it was obtained.
Our PM data is obtained through the ILM2 API. By scraping it, we can obtain the backlog of data, and get more specific data once we need it. An example of the link that we scraped is https://api.dustmonitoring.nl/v1/project(30)/location(575)/stream?$skip=14544. This means that for location 575 we have already obtained the first 14544 entries, and want the next set. After that, we can use @odata.nextLink to get the next URL. This gives entries separated by measurements. This means that a set of measurements is given, with for example the longitude, latitude and PM10 separately. A sample of a single location (521) gives the following. 
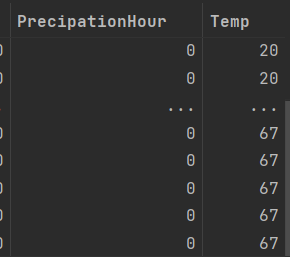
After combining them into a single ‘prepared’ DataFrame, saved as full_measurement.csv, we have a DataFrame that combines the measurements into a single row. The head of this DataFrame, focused on a single location, is the following. 
As you can see, it has the three relevant measurements, their date and time, and the location they belong to in a single entry.
There is also measurement_info.csv and locaties-airboxen.csv. Two supplemental datasets. measurement_info is a reference for the units. This means that if you have the name of the entity, such as PM1, it can associate the unit to it. Seeing as the unit isn’t always relevant, this was placed separately for easy reference. The same goes for locaties-airboxen.csv.
For the modelling, we also worked with a dataset that combined some relevant weather data with our existing measurements. However, currently, the only weather data we have is until May 16th 2023, saved in hourdata_eindhoven_2021_16may2023.csv.
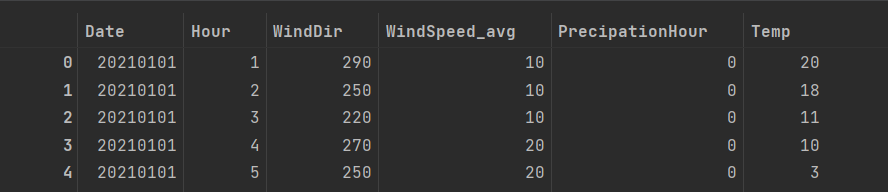
Originally the data we obtained from the KNMI had much more variables, but we didn’t need most of them, as they weren’t relevant to our domain. The full dataset can be found as uurgeg_370_2021-2030.csv.
After combining it with our PM measurements with the frequency of an hour and using the average, we saved this in hour_combined_data_eindhoven_2021_16may2023.csv. This indicates the timeframe, that it is for every hour, and is for Eindhoven. 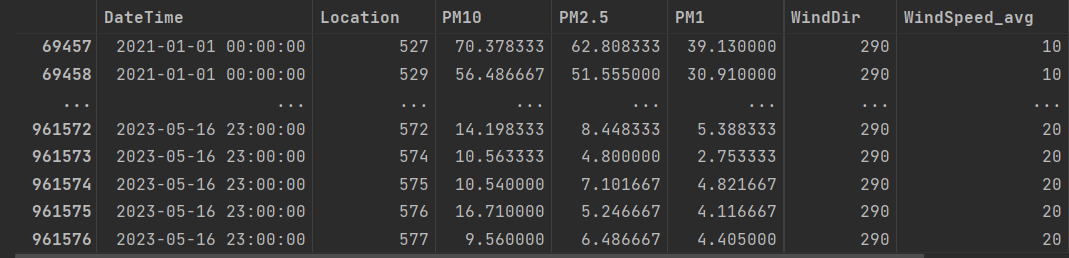
With these datasets, we did our modelling. For our closest location model, we used locaties-airboxen.csv. This file is also found in the same folder as our API so it is included in the docker image. The other files are currently in the back-end repository but not included in the docker image, as they are added on an as-needed basis. They are separated between raw files (such as the scraped data) and non-raw files, such as the locaties-airboxen.csv.
Within the application, the process is as follows:
- The user visits cdt.skylervermeer.nl/ar.html
- The website requests the user’s location.
- The user’s location is sent to the API and is used with a KNN model to get the closest location.
- The closest location ID is returned and stored in a global variable.
- The closest location data is requested in the API and returned and the models are displayed.
2.2 Data Choices
At the start, when choosing our data we had a few requirements:
- The data must be collected consistently, so we can see trends and outliers.
- The data must be collected regularly, so we can show the current amount of fine dust in the area.
- The data must contain some form of timestamp.
- The data must contain some form of location.
- The data must contain a measurement of fine dust, preferably PM1, PM2.5 and PM10.
Eventually, we chose to use the ILM2 network from TNO, as this is a renowned research organization. This allowed us to have data for every 10 minutes, updated every hour. It had locations, timestamps and PM1, PM2.5, and PM10 (as well as some others). This was also the data that our expert Jean-Paul worked with, so it allowed for easier communication.
However, as we were exploring this data we found some irregularities. We contacted TNO and had a meeting about it, resulting in them saying that for the most accurate results we needed to use the placement dates as they are mentioned in their 2021 report. For example, a location (575) that was placed in November of 2021, already had data for 2019 due to an error in their API.
So the data is more accurate than regular sensor networks, easily accessible with an API and constantly monitored for downtime by a renowned organisation. However, the API in itself isn’t trustworthy and some data needs to be verified.
For the weather data, we used the data from KNMI, which had 2021 to mid May 2023 data. It has hourly data for Eindhoven, but seeing as we also need the data for the rest of may to now, we do need something supplemental for deployment. However, it allowed us to test the model for now without paying from an account from an API, without having to scrape ourselves and spend a lot of time there. After we verified that weather data was beneficial to our project, Simona and I found WeatherAPI which has a free and a paid subscription, which can be fit to the project’s needs.
3. Repositories and CI/CD Pipeline
3.1 Repositories
Originally, I had a single repository with the front-end, back-end and documentation of the project, Combined Repository. It seemed a good idea at first, but it meant that I couldn’t switch branches without losing progress, and if I had documentation in two different experimentation branches it would cause problems. That is why, when I was able, I switched it to three seperate repositories. These repositories are Front-end, Back-end, and Documentation. Front-end and Back-end both have CI/CD pipelines that automatically update the docker images and renew the containers hosting the application on a commit, and SonarQube creates automatic code reviews. Documentation does not need that functionality.
3.2 Continuous Integration
The main reason that we are implementing Continuous Integration is so code is evaluated automatically so large errors are caught early. I have worked with SonarQube before and I have worked with Gitlab pipelines before so I know both of these work. That is why I will be using these to set up my pipeline, at least in the basics.
We are using a docker-in-docker image to update the docker image for continuous integration. The publish step will build the new image, log in to docker using hidden variables and push to the relevant docker tag.
  - docker build ./Website -t skylervermeer/cdt-air-zoomlens:website
  - docker login -u $DOCKER_USERNAME -p $DOCKER_PASSWORD
  - docker push skylervermeer/cdt-air-zoomlens:website
After that, we are processing it through SonarQube. Currently, it will allow it to fail. However, this can be adjusted so if the Quality Check does not succeed, the pipeline will fail. For this, we use the sonar-scanner-cli image and the sonar-scanner command. Based on some hidden variables this will automatically scan and show the results on the dashboard. 
3.3 Continuous Deployment
After successful integration, we want to deploy the new application to our own environment and domain. This is useful because the application requires HTTPS and CORS in some aspects, so this automates the deployment on a commit. You can also adjust this so deployment only executes when the commit is pushed to a certain branch, but for our development purposes, this is not worth it.
For this deployment, we use Python, as we want to connect to SSH (our server) to deploy our application.
- chmod og= $ID_RSA
- apk update && apk add openssh-client
- ssh -i $ID_RSA -o StrictHostKeyChecking=no $SERVER_USER@$SERVER_IP "docker login -u $DOCKER_USERNAME -p $DOCKER_PASSWORD"
- ssh -i $ID_RSA -o StrictHostKeyChecking=no $SERVER_USER@$SERVER_IP "docker pull skylervermeer/cdt-air-zoomlens:website"
- ssh -i $ID_RSA -o StrictHostKeyChecking=no $SERVER_USER@$SERVER_IP "docker container rm -f cdt-frontend || true"
- ssh -i $ID_RSA -o StrictHostKeyChecking=no $SERVER_USER@$SERVER_IP "docker run -d -p 8000:8000 --name cdt-frontend skylervermeer/cdt-air-zoomlens:website"
This will log in to docker, pull the new image, remove the previous image and run the updated image on the port that is forwarded to cdt.skylervermeer.nl.
4. Future Development
4.1 Pulling Repositories
The repositories are all publicly available on the FHICT Git. You should be able to clone all of them without any problem to explore and continue development.
4.2 Updating the Deployed Application
After I complete the project, I will give Simona Orzan the Maintainer role. This means that she can also add members to the repository. This way, new project members can easily gain access to the project and can update the deployed applications simply by pushing, as that is how the pipeline is set up.
However, seeing as the docker containers are on my private server, you won’t be able to see the logs.
4.3 Transferring the Deployed Application
Eventually, the application should be deployed somewhere other than cdt.skylervermeer.nl. Both because it should be on a domain that is easier to find, but also because it is best if developers can see the logs. It should be able to be transferred simply by updating the variables for the CI/CD pipeline in the repository. This way, the application pulls the image from the docker and pushes it to a container on the new server.
The following variables are used in both the front-end and the back-end repository.
| Type | Key | Value | Protected | Masked |
|---|---|---|---|---|
| Var | DOCKER_PASSWORD | Password for Docker Account | ✓ | ✗ |
| Var | DOCKER_TLS_CERTDIR | ”” | ✗ | ✗ |
| Var | DOCKER_USERNAME | Username for Docker account | ✓ | ✗ |
| File | ID_RSA | The file that is needed to connect to the server through SSH. -----BEGIN OPENSSH PRIVATE KEY----- A bunch of text-----END OPENSSH PRIVATE KEY----- | ✓ | ✗ |
| Var | SERVER_IP | The IP that the server is hosted on. Is used to connect to it through SSH | ✓ | ✓ |
| Var | SERVER_USER | The user of the server that is going to be ‘executing’ the docker commands. I created a seperate one called deployer. | ✓ | ✓ |
| Var | SONAR_HOST_URL | Host where SonarQube can host the dashboard. In my case http://sonarqube.skylervermeer.nl | ✗ | ✗ |
| Var | SONAR_TOKEN | Token for SonarQube. Can be obtained by creating an account, clicking on said account, tab security and inputting a name and selecting generate. | ✗ | ✓ |
| Var | WEATHER_API_KEY | API key for https://www.weatherapi.com/ | ✗ | ✓ |
Seeing as you are probably not allowed to push to a private docker repository using different credentials than the owner, you might need to create one yourself and change the pull and push requests to {your username}/cdt-air-zoomlens: api or whatever name of the repository you choose.
If you do use a new repository, you do need to get some runners. These might be able to be arranged by FHICT, but in case they are not and you want to run them on your own server, here are the steps I followed.
- Install GitLab runner
- On my own server, run:
sudo gitlab-runner register --non-interactive --url "https://git.fhict.nl/" --registration-token "{token that gitlab provides you under Settings -> CICD -> runners}" --executor "docker" --docker-image alpine:latest --description "docker-runner" --tag-list "docker, CICD" --run-untagged="true" --locked="false" --access-level="not_protected"
- Check whether it has a green dot at Available Specific Runners (Settings -> CI/CD -> Runners)
In the case that you host it on an external server, you do need to update the DNS to include your new (sub)domain names and open ports 8000 and 3000 to the outside world. In our case, we used LetsEncrypt to get HTTPS certificates for the website. Some form of HTTPS is needed to ensure CORS and AR.js and AFrame work properly.
Of course, if you change the domain names, you also need to change them in the application. They aren’t often used, mostly in Ajax requests. A simple find-all in main.py and relative.html should get you most of them.
Conclusion
The architecture of the system has been documented, and so have the data collection and storage and the choices made. The setup of the repositories has been explained, as well as the steps on how future project members can use the repositories, both initially as well as transfer them for future use.